Showing posts with label dinner. Show all posts

Friday, July 24, 2015

Thanksgiving in July: Slow Cooker Stuffing

"Tomorrow, I'm going to make stuffing in the slow cooker."


As a single person, I tend to accumulate a lot of half-loaves of hardened bread in my freezer. It's too stale to make a decent sandwich with, but it's not moldy or bad for me.


So, in the spirit of minimizing food waste, I got to thinking about what to do with hard bread. STUFFING!
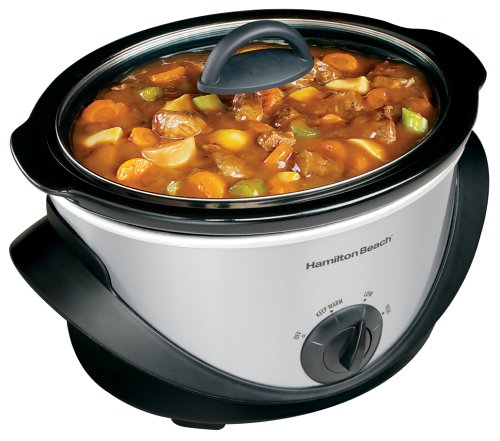
Hamilton Beach 33141 4-Quart Oval Slow Cooker
Hamilton Beach 4-Quart Oval Slow Cooker
 (Amazon Affiliate Link)

Bought for myself as a reward 
for finishing NaPoWriMo.

Then, in the spirit of being obsessed with my new slow cooker, I did a Pinterest search for slow cooker stuffing, and found out it's totally a thing.


Slow Cooker Stuffing


Ingredients:
12 cups dry bread cubes (The original blogger baked the bread cubes to dry them out, but my bread was already so dry from squatting in my freezer, I skipped that step.)
2 cups celery (about 4 stalks)
1 cup finely chopped onion
1/4 cup dried parsley (or 1/2 cup fresh chopped parsley if you plan ahead better than I did)
2 tsp dried sage
1/2 tsp dried thyme
1/2 tsp salt
1/4 tsp pepper
14.5 oz can broth (1 3/4 cups)
1/3 cup butter, melted


1. Combine everything except the broth and butter. Pour the broth and butter over the top. Mix well.
2. Transfer mixture to slow cooker. Cover and cook on low for 4 to 5 hours.


It smelled too good, so at hour 3, I broke into it early. The celery and onions were still raw but the flavors had saturated the bread well. I ate it with a turkey breast and side of mashed potatoes I got at a deli. (What am I, supposed to cook 3 things?! Preposterous.) I let the rest of it finish cooking and stored it to make a week's worth of Slow Cooker Stuffing Sandwiches.

Original recipe from The Kitchen is My Playground. With thanks.


Today's art print is "Bread and Butter" by Robo Rat. Just too cute.

Bread & Butter Art Print

Friday, January 18, 2013

Roasted Chicken: Making it a Meal

“Tomorrow, I’m going to make a very fancy roasted chicken.”


Roasting a chicken makes me feel like the most powerful kitchen wizard, and it isn’t even that difficult.  You could sum it up in just a few words:  Put chicken in 400 degree oven.  Take out when the thigh meat is 180 degrees Fahrenheit (about 90 minutes).  Eat.  

My blurry chicken. I got excited and ripped off the legs in joy.
But we make things more complicated for ourselves.  So here are a few tips I have picked up:

Spice Blends Help
If you don’t know how to season the bird, just stick with poultry seasoning.  I made this chicken with garam masala, a north Indian spice blend.  It takes the guesswork out of seasoning, and you can experiment with spices as you learn to combine them.


Clean Hand, Dirty Hand
This is a trick that I picked up doing tissue culture in the lab.  You keep one hand clean, and use the other to touch possibly contaminated items.  While prepping the bird, use your clean hand to grab the salt shaker, the spice mix, the lemons, and the like.  Use your dirty hand to rub them around the bird, lift the bird up and rotate it, etc.  When you’re finished, wash both hands with soap and very hot water.  This prevents poisoning yourself and others with salmonella.

Veggies are Good
I’m still working on perfecting a method to produce perfectly cooked veggies on the same time scale as the chicken.  What I do know is that you should stir them up a bit every half an hour or so so that they cook evenly and are evenly moistened with chicken juices.


Use Foil
You can use foil to wrap up the ends of the legs and the wings up with foil if they start to get too dark.  This seems easier than tucking and tying that some recipes make you do to keep the extremities from burning.

Make a Finishing Sauce
Roasted chicken and veggies are only made better with a moist sauce to add more intense flavors to their own.  Gravy is the classic choice.  I’m still figuring out how to make a good gravy from a small roast chicken. I usually make it from a mix. For this meal, instead of gravy, I made parsley gremolata by blending garlic, parsley, and lemon zest.  A bright, herby sauce like this is a fresher, brighter alternative to gravy.


Have fun crafting tasty meals around a roasted bird!


Tuesday, January 15, 2013

Comfort in a Bowl: Matzo Ball Soup

“Tomorrow, I’m going to make one of the most beloved comfort foods of all time.”


This month, I am gravitating towards comfort foods.  Hot, steamy, mushy, salty comfort foods. Matzo ball soup is one of the most popular and well known comfort foods in the world. It originated in Eastern Europe, where dumplings are very popular.  Jewish women made them with matzo meal, possibly to be kosher for passover or possibly because they just had a lot of matzo around. Whatever the reason for their invention, matzo balls taste amazing. Their popularity is well deserved.

Prior to making it myself, I had tasted matzo ball soup only once in my life, when Sarah and I made it from a mix using some questionable egg replacer in place of the eggs.  It was pretty good, actually. But to make it from scratch, the only non-pantry staple item you need to buy is matzo meal.

Found in the Kosher/Jewish foods section.

Then I made it myself, and I am officially hooked!  Making it from scratch isn’t all that different from making the box mix.  Matzo meal, salt, pepper, water, fat and eggs are mixed together.  You chill the mixture for a bit, shape it into dumplings, and cook them.  Then you add them to chicken broth, which can have carrots and other veggies added to it if you like.  Pretty simple.

When homemade stuff doesn't cut it, this is my secret weapon.

I used leftover broth from my turkey soup.  It wasn’t quite flavorful enough, so I added a little chicken bouillon.  Is this cheating? Possibly.  Did my tastebuds really mind? No.


Matzo Ball Soup
(makes 8-12 matzo balls)
½ cup matzo meal
1 teaspoon salt
¼ teaspoon pepper
2 eggs
2 tablespoons chicken fat or vegetable oil
2 tablespoons seltzer water

2-3 quarts chicken broth (See my note)
1 carrot, sliced
Fresh dill

Mix the matzo ball ingredients together. Chill for 30 minutes.  Bring a large pot of salted water to a boil and turn down to a bare simmer.
Wet your hands and roll the mixture into balls about 1 inch in diameter.  Carefully drop the balls into the simmering water.  You may want to use a slotted spoon for this.
Cover the pot and simmer for about 30 minutes.  Meanwhile, bring the broth to a boil and turn the heat down to simmer.  Add the carrots and simmer for 5-10 minutes (depending on how big your carrot pieces are).
To serve, lift 2-3 matzo balls out of the water into a soup bowl.  Ladle broth and carrots into the bowl, and top with a few pieces of fresh dill.

Rachael’s note:  Don’t worry if you don’t have enough broth.  You can get by with less than two quarts if you aren’t serving many people. My rule would be about 2 cups per bowl of soup you intend to eat. Make more broth if you love broth, less if you’re more about the matzo balls.  People will tell you homemade is the only way to go but canned/boxed broth or bouillon added to water both taste just fine to me! Disclaimer: I love bouillon.

Recipe Source: Matzo Ball Soup from smitten kitchen.

Matzo Ball Soup Info Sources:
Arfa, Orit. “Thinking Outside the Matzah Ball Box” JewishJournal.com.  25 Mar 2009. Accessed 8 Jan 2013.  
Jewish Cooking.”  Judaism 101. Accessed 8 Jan 2013.

Saturday, January 12, 2013

Slow Food: Pork Ragu

“Tomorrow, I’m going to make a slow cooked ragu.”


When you have a day to spend around home, slow cooking a sauce in the oven is wonderfully relaxing.  You can do nothing while a lovely aroma spreads through the house, and you seem a kitchen hero to your family.  I recently made a pork ragu in this manner.

Lie in front of the fire while your dinner cooks itself!

A “ragu” in Italian Cuisine refers to a meat based sauce.  It can have tomatoes in it, but the meat is the main attraction.  A tomato based sauce can have meat in it, but it isn’t a ragu unless it is mostly meat.  So, the Ragu brand pasta sauce at the supermarket (while I’m sure it is delicious) isn’t technically ragu at all.  

Even more technically, this ragu is a Neopolitan Ragu, in that is uses a whole cut of meat rather than chopped up into pieces.  The whole cut of meat is a boneless pork shoulder.  After 3 hours of braising, it was tender to the point of falling apart.  The perfect main attraction for a ragu.

Browned pork shoulder, waiting for braising liquids.

However, the pork needs a lot of support to make it delicious.  It is flavored with shallots, leeks, tomatoes, red wine and spices.  Most noticeably, there is a hefty dose of Sriracha hot sauce. The flavors that resulted were warm, comfy, and slightly spicy.  


I served it over penne with an accompanying salad using my new favorite ingredient, prunes!  Prunes taste lovely in vinaigrette.  They have been tainted by their use as a constipation treatment.  They are so fruity and sweet.  Anything fruity and sweet goes really well with pork!


Sriracha Pork Ragu
(serves 6-ish)

3 lb boneless pork shoulder, trimmed of skin and excess fat
salt and pepper
3 tablespoons olive oil
1 tablespoon butter
2 shallots, chopped
4 garlic cloves, chopped
1 big leek, white and light green parts, chopped
2 14.5 cans chopped tomatoes and their juice
1 cup red wine (I used pinot noir)
2-3 tablespoons sriracha hot sauce, depending on how spicy you like things
5 thyme sprigs
2 teaspoons dried oregano
about a teaspoon fennel seeds

dried pasta
Grated parmesan cheese, to serve

Pat the surface of the meat dry and generously salt and pepper it. Preheat oven to 325 F.  Set a Dutch Oven over medium high heat.  Heat olive oil and butter until butter melts.

Add meat to pan and brown on all sides.  You may have to turn it to awkward angles to get the whole thing browned, but get it all; you don’t want any raw meat to contact your veggies.

Add garlic, leeks and shallots to the pan.  Toss them around to coat in oil and saute until softened, only a few minutes.

Add tomatoes, wine, hot sauce, thyme, oregano and fennel. Liquid should reach about ⅓ the way up the side of the meat.  Add wine or tomato juice if necessary.

Cover with a tight fitting lid and slide the whole thing into the oven.  Cook for 3-4 hours, turning the meat over once an hour.  I knew mine was done when I attempted to turn it over and meat slid right off.

Remove the meat and shred with two forks.  Return to pot and stir everything up.  Taste and add salt, pepper or hot sauce to your liking. Cover to keep warm.

Boil water and cook your pasta.  Serve sauce over pasta and top with parmesan cheese.

Source:  Braised Pork Ragu with Pappardelle, from Dinner: a love story

Tuesday, December 11, 2012

Borscht: An Eastern European Tradition


“Tomorrow, I’m going to learn about Eastern European food.”


Before I made Borscht a few days ago, I knew (or thought I knew) very little about it. My sum knowledge was:
  • Its Russian
  • Beets are involved
  • On the show Rugrats, Tommy Pickles’ grandma made it

Upon further research, I have learned that the term “Borscht” is just about as general as the term “Chowder.”  I revised my knowledge:
  • Its actually Ukrainian, but variations are popular throughout Eastern Europe
  • Beets are usually involved, but not always

There is no one way to make borscht.  The Ukrainian version of beets cooked in meat broth is what many people associate with borscht.  However, recipes have been passed down through families from generation to generation, with everyone changing it to suit their tastes and resources.   Some add other veggies and extra meat.  Some serve it with sour cream. Or yogurt. Or radishes. Or mushrooms. They add tomatoes, or replace the beets altogether. The possibilities are endless, and I’m sure everyone thinks their version is the best. That's the beautiful thing about traditional food.

The only rule: borscht is red.
I chose this recipe for several reasons.  First, it was cheap.  There aren’t any whacky cuts of meat or a long list of ingredients.  Second, it was fast.  On this particular day, I didn’t want to simmer a cow leg all afternoon.  In fact, since I cooked it for Sarah, I didn’t want to use any cow parts at all. She doesn’t eat cows.  Last but certainly not least, it is light and healthy.  Beets and cabbage are full of nutrients!

Can nutrients be absorbed through skin? If so, I'm set.
The results were fantastic, and I think borscht will replace simple roast beets as go-to dish for any beets I get in my CSA box next year.

Bonus tip:  Beet juice can be removed from hands, baby faces,  and other surfaces with an acid (like vinegar or lemon juice) plus salt.

George is 1/16 Russian and he approved.
Beet and Cabbage Borscht

½ head red cabbage
3 medium raw beets, peeled and quarters
4 tablespoons butter
½ medium onion, chopped
3 cloves of garlic, fineley chopped
6 cups chicken broth (or vegetable broth for vegetarian version)
2 teaspoons salt
½ cup roughly chopped fresh dill
about 1 ½ teaspoons red wine vinegar
Sour cream or yogurt
Use a blender or food processor to grate the beets.  Shred the cabbage using a food processor, or chop the cabbage.  (I tried using a blender to shred the cabbage and was woefully unsuccessful.)

Melt the butter in a soup pot over medium heat.  Add the onion and saute until soft.  Add the garlic and cook for one minute.  Add the cabbage and beets, turn up the heat to medium high, and cook for about 10 minutes, stirring occasionally.

Add the broth and 1 teaspoon salt, bring to a boil and simmer, uncovered, for 30 minutes.  Add the dill, vinegar, and remaining salt.  Taste, and add more vinegar if the soup is too sweet.

Serve with sour cream.

Recipe Source: Slightly adapted from Cook This Now, by Melissa Clark

Borscht info sources:
Meek, James. “The story of borshch.The Guardian, 14 March 2008.
“The Food Timeline: Soup.”
Wikipedia article on Borscht

Thursday, December 6, 2012

Holiday Leftovers: Winter Squash Risotto

 “Tomorrow, I will use up my leftover squash puree.”


I never seem to have the exact amount of squash puree that a recipe calls for.  Sometimes I have too little to use in another recipe, yet too much to throw out.  Usually it ends up in the trash anyway. Or ends up sitting in the fridge for weeks before ending up in the trash. But how do you use a tiny amount of squash puree?  Why, throw it in a risotto of course! 

Disclaimer: risotto in general is not a health food, and this version is no exception.  It is butter, starchy, and cheesy.  “Carb-tastic,” if you will.  I try to limit my portion size.

The beauty of this recipe is that you can vary the amount of squash that you use, depending on how much you have and how much squashy flavor you like.  A little bit of squash just adds a layer of depth to the primary cheese flavor.  Adding more will feature the squash flavor more prominently.

Even the smallest amount will turn the risotto a brilliant orange, making it look similar to Kraft Macaroni and Cheese.  That resemblance alone made the picky eaters in my life much more open to trying it!

I served this as a side dish to steaks.  That was a mistake. Its so heavy and creamy, I think that it can be a meal on its own, when accompanied by an interesting salad.

Winter Squash Risotto

3 tablespoons butter, divided
½ medium onion (or one small onion), finely chopped
¼-3/4 cup winter squash puree (ie pumpkin, kabocha, butternut, I used red kuri)
1 ½ cups Arborio rice
~5 cups chicken broth
½ cup white wine
⅓ cup finely grated parmesan cheese
salt

Melt 2 tablespoons butter in a large saucepan over medium heat.  Add onion and cook until translucent.  Add rice and toss well to coat with butter. Stir and cook until translucent, but be careful not to allow the rice to brown.

Add the wine.  Cook until the wine is almost entirely absorbed.  Add the squash puree and 1 cup of broth.  Simmer, stirring occasionally until the liquid is almost entirely absorbed, then add another ½ cup broth.


Continue cooking, adding broth in half cup increments when the liquid is almost absorbed.  The rice should never get dry.  After about 20 minutes from the first addition of broth, start tasting the rice for doneness.  When the risotto is done, the rice will be tender but not mushy.  You may not need the full 5 cups of broth (I didn’t.)


When the rice is tender, add 1 tablespoon butter and the parmesan cheese. Turn off the heat and stir the risotto vigorously.  Season to taste with salt. Let stand for a few minutes before serving.


Source: Heavily adapted from The Art of Simple Food by Alice Waters


Some pictures of the cooking process that might help you:

Liquid is not absorbed, just stir and cook
Liquid has been absorbed- add more broth

Tuesday, December 4, 2012

Holiday Leftovers: Turkey Kale Soup

“Tomorrow, I am going to use up my leftover holiday turkey.”

Soup is a delicious way to use up a great deal of leftover turkey from Thanksgiving or another holiday feast. Turkey soup is healthy and light, which is a nice counterpoint to the rich meals of this time of year.


I made broth by boiling the turkey carcass and some assorted vegetables.  Apparently bones contain magical substances that combine with water to become pure deliciousness.  Don’t throw away your turkey bones without unleashing their awesome power!


So Christmas-y!
Making broth takes a long time, but you don’t have to pay much attention to it.  It just kind of does its thing.  If you have time, I suggest cooling the broth in the fridge so you can scoop off the congealed fat that floats to the surface.  Its a dirty job, but I’d rather have the fat in the garbage than in my arteries.

For the rest of the soup, I sauteed some onions/celery/carrots, which also happened to be leftovers from Thanksgiving.  Don’t use the veggies from the broth, they’ll be slimy and bland at this point.  I added some turkey and cooked kale and voila!  Soup!


Turkey Kale Soup

Broth: 1 turkey carcass
2 parsley sprigs
2 thyme sprigs
1 carrot, cut into chunks
3 celery sticks, trimmed and cut into chunks
1 small onion or half of a large onion, peeled
1 bay leaf

Soup:
Olive oil
1 small onion or half a large onion, chopped
3 celery sticks, chopped
1 large carrot, chopped
1 head of kale, stems removed
1-2 cups leftover turkey, shredded

Place turkey carcass and all other broth ingredients in a large pot.  Cover (or mostly cover) with water (about 4 quarts).  Simmer for two hours. If you have time, cool and skim off fat.
Bring a pot of water to boiling, and add the kale.  Cook for 3-5 minutes until bright green and tender.  Drain, rinse with cool water and chop.  
Saute onions, celery, and carrots in olive oil until soft.  Add broth, turkey and kale.  Simmer until heated through, about 5 minutes.

Source: The Art of Simple Food by Alice Waters